Tag Archives: Storage

Anything storage related

ScaleIO: Deep Dive on Imperative Deployment

By now you probably have read the blog post, ScaleIO Framework v0.3: Deploy This!, where we announced the new version of the ScaleIO Framework. (If you haven’t, I would definitely go check it out first.) In that release, a new feature called Imperative Deployment was unveiled which is the first structured method for deploying ScaleIO into your Apache Mesos cluster. In this blog post, we are going to do a deep dive for that feature and highlight some of the interesting and cool things that Imperative Deployment brings to this release.

Let’s Kick this Off

The first thing we should point out when it comes to ScaleIO is that you need a strategy when it comes to how you want to deploy it. Since ScaleIO is flexible and allows for infinite possible combinations, each one of those combinations has pros and cons. So it turns out that the marketing material that makes ScaleIO super easy to use glosses over the fact that there is actually a set of best practices that you need to adhere to get the most out of ScaleIO.

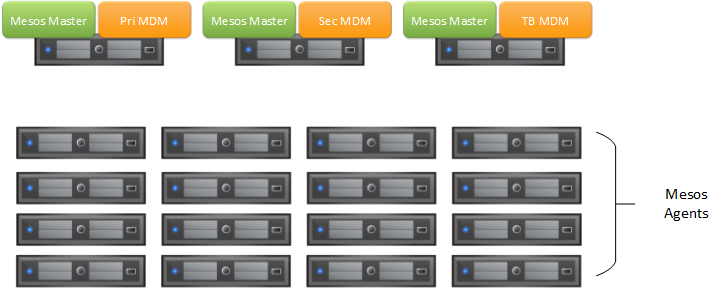
We are going to tackle various ScaleIO deployment scenarios in a series of installment blogs and our first topic will discuss environments for demos, dev/test, and smaller configurations. In this type of configuration, a fully distributed or hyper-converged deployment might be best to roll out since you are dealing with a relatively small number of systems. Demo and dev/test environments are trivial as it “just needs to work” and performance is an afterthought. So let’s take a look at a real world hyper-converged configuration. It goes without saying that you want to have at least a 3-node Mesos master quorum to tolerate failure. For the ScaleIO MDM nodes (Primary, Secondary, and TieBreaker), we will make use of the 3 nodes used for the Mesos masters. Then for the compute, we will have 16 Mesos Agent nodes configured each with a single 2TB drive. This configuration must have already been pre-created prior to deploying the ScaleIO Framework.

Mesos Configuration

To deploy ScaleIO using the Framework’s Imperative Deployment feature, you would define similar Mesos Agent attributes as mentioned in the “Deploy This!” blog article. Before we begin, it is important to understand what the scaleio-sds and scaleio-sdc attributes really mean. The scaleio-sds represents the protection domains and storage pools that will be created on ScaleIO and which disks/devices will be contributed to that domain/pool combination. The scaleio-sdc represents the protection domains and storage pools to which that particular node will provision and consume ScaleIO volumes from. So very simply put, the difference between sds and sdc is sds is the server configuration of the disk/devices offered up to ScaleIO and sdc is the client configuration to consume volumes from ScaleIO.

The Imperative Configuration

So in the 3 Mesos Master + 3 ScaleIO MDMs and 16 Mesos Agent node configuration defined above, if you had the 2TB drives installed at /dev/xvdf for each node (can be verified using fdisk), your Mesos Agent node’s attributes would look like the block below. Note that any changes to your Mesos Agent attributes will require a restart of your Mesos Agent service before deployment of the Framework.

# cat /etc/mesos-slave/attributes/scaleio-sds-domains
mydomain

#cat /etc/mesos-slave/attributes/scaleio-sds-mydomain
mypool

# cat /etc/mesos-slave/attributes/scaleio-sds-mypool
/dev/xvdf

# cat /etc/mesos-slave/attributes/scaleio-sdc-domains
mydomain

#cat /etc/mesos-slave/attributes/scaleio-sdc-mydomain
mypool

Now a few things should be noted. It might be wise to use more meaningful names than mydomain or mypool. If this was for the Quality Engineering department, maybe mydomain can be replaced with engineering and mypool with qe. The next thing is this assumes all devices are configured at /dev/xvdf but depending on your storage controller, the drive might be at /dev/xvdg for example, so replace it with the discovered or assigned value. Lastly, since REX-Ray currently only supports provisioning volumes from ScaleIO on a single protection domain and storage pool, we could omit the definition of any /etc/mesos-slave/attributes/scaleio-sdc attributes. There exists code such that the last defined scaleio-sds domain and pool are automatically used for the scaleio-sdc components. When REX-Ray implements multi-domain/pool capabilities, this code will likely be deprecated.

Finally, let’s assume that we know for certain that all the disks/devices are attached to /dev/xvdf because the initial setup was performed using your favorite DevOps tool or you are in AWS (/dev/xvdf happens default when you add your first disk), you could have deployed based on the ScaleIO Framework’s Single Global Pool method which would automatically attached all unused (ie without a filesystem) disks on the 16 Mesos Agent nodes. The default protection domain and default storage pool names can be overwritten with meaningful names using the configuration options -scaleio.protectiondomain=engineering and -scaleio.storagepool=qe. The end results of both methods in this particular case would have been identical.

Huge Mistake

This appears to be simpler than the Imperative deployment, why don’t we just use the Single Global Pool method all the time? First, keep in mind that only a single protection domain and single storage pool can be created. You may want to have more that one and in that case, you must use Imperative Deployment (Example Below). Second, if you have disks without a partition that you want to allocate for some other function like additional local storage, the Single Global Pool method will automatically consume and contribute that disk/device to ScaleIO. Warning: This includes Agent nodes to be added to the cluster for expansion! Defining these attributes for new nodes to be on-boarded to the cluster yields an explicit configuration and without these attributes, newly on-boarded nodes will contribute all disks/devices presented to that node based on the -scaleio.protectiondomain and -scaleio.storagepool configuration options.

An example of multiple StoragePools. Maybe Mesos Agent nodes 1-8 are defined like:

# cat /etc/mesos-slave/attributes/scaleio-sds-domains
engineering

#cat /etc/mesos-slave/attributes/scaleio-sds-engineering
qe

# cat /etc/mesos-slave/attributes/scaleio-sds-qe
/dev/xvdf

And Mesos Agent nodes 9-16 are defined like:

# cat /etc/mesos-slave/attributes/scaleio-sds-domains
engineering

#cat /etc/mesos-slave/attributes/scaleio-sds-engineering
development

# cat /etc/mesos-slave/attributes/scaleio-sds-development
/dev/xvdf

What’s next?

A piece of functionality that is currently being worked on is Fault Sets. This will allow one to specify which nodes can fail without data loss. This will naturally allow for advanced configurations for ScaleIO and happens to be the target for the next blog article in this series.

Further down the road, there are plans to work on a Declarative Deployment option which kind of sits between the simplicity of the Single Global Pool and the explicit Imperative Deployment methods. By providing more abstract constructs, your end result will yield deployment of bigger configurations without getting into the weeds of managing what devices belong to what protection domain or storage pool.

Be sure to check out the ScaleIO Framework project on GitHub and visit the {code} labs page to test drive this feature. All feedback is welcome!

Looking Back at EMC World 2016

Wow! How quickly a week can go by. Like many of you, EMC World 2016 was my first time in attendance and it also happen to be the first time I have been given the opportunity to be a presenter for a larger audience. I though the experience exceeded my expectations and based on some of the preliminary numbers and feedback that we have been getting on the sessions the EMC {code} team had presented, a good number of you agree the sessions content and presentations were of value to you. Thanks again for attending the sessions and providing your feedback.

Couldn’t make it this year?

For those that couldn’t make it out this year, a number of people in {code} have starting posting the materials and slide decks for our sessions. Official EMC World slide decks should be posted in the coming weeks, but there have been a large number of requests to get a hold of the material ASAP and many of us on the team have been happy to oblige. As for my sessions, you can find the materials below.

Introduction To Mesos & Mesosphere

Here is the session material for Introduction To Mesos & Mesosphere (Monday May 2 at 8:30) which just as the title says is a Apache Mesos 101 type session.

You can download the “Introduction To Mesos & Mesosphere” powerpoint presentation HERE. The video of the demonstration used at the end of the session highlighting Mesos using persistent external storage can be found on YouTube below:

The source code for the MVC Web Application written in Golang can be found in my GitHub repo. The two projects used in demo were RestServer and RestClient.

To launch the MVC Application with external persistent storage, you first need to have each of your Mesos Agent/Slave nodes running Mesos DNS and configured for persistent external storage using this Guide. Once you have those prerequisites in your Mesos Cluster, you can find the Marathon JSON files to launch tasks here. To start up the application, perform the following:

Start PostgreSQL:
curl -k -XPOST -d @postgres-mvc.json -H "Content-Type: application/json" YourMarathonIP:8080/v2/apps

Start RestServer:
curl -k -XPOST -d @restapi.json -H "Content-Type: application/json" YourMarathonIP:8080/v2/apps

Start RestClient:
curl -k -XPOST -d @ui.json -H "Content-Type: application/json" YourMarathonIP:8080/v2/apps

Deep Dive With Mesos & Persistent Storage For Applications

Here is the session material for Deep Dive With Mesos & Persistent Storage For Applications (Tuesday May 3 at 3:00) which covered the importance of Apache Mesos Frameworks and the powerful capabilities that 2 layer scheduling provides in your Datacenter and Mesos cluster.

You can download the “Deep Dive With Mesos & Persistent Storage For Applications” powerpoint presentation HERE. The video of the demonstration used at the end of the session highlighting the Elastic Search Mesos Framework using persistent external storage can be found on YouTube below:

To launch the Elastic Search Framework with external persistent storage, you first need to have at least a 3 Agent/Slave nodes in your Mesos cluster and each of your Mesos Agent/Slave nodes configured for persistent external storage using this Guide. To start the ElasticSearch scheduler, you can find the Marathon JSON files to launch task here. To start up the Scheduler, perform the following:

Start ElasticSearch Scheduler:
curl -k -XPOST -d @elasticsearch.json -H "Content-Type: application/json" YourMarathonIP:8080/v2/apps

If you want to run some of the advanced ElasticSearch functionality used in the demo, you can find additional information in this file here.

What’s Next…

After recharging for a bit, we have already started on our post-EMC World plans and deliverables. Hopefully this will bring a forth a bunch of interesting ideas and projects for the community. To keep up to date with the things that I will be working on, please follow me on Twitter at @dvonthenen. If anyone has any questions about the EMC World presentations, you can always catch me on the {code} Community Slack channel.

mesos-module-dvdi Installation Walkthrough

As other people in the EMC {code} team started getting involved with Apache Mesos, I have been helping by fielding questions and troubleshooting installations of both Mesos and mesos-module-dvdi so that others can kick the tires and become subject matter experts. It was brought to my attention that a good clean walkthrough of adding external volume/storage support to an existing production Mesos cluster might be of value to others which brings us to this blog post. We will cover a couple examples of launching Marathon tasks to make use of our new found capability. Also, we will take a look at functionality that the mesos-module-dvdi brings to the table and talk about what those features mean to you.

Preflight Checklist

Before we begin, I want to make sure that everyone who is going to follow along has a properly configured Mesos cluster and for those that don’t have a Mesos cluster, there is a very good walkthrough guide by DigitalOcean that I would highly recommend. I would encourage performing every step in this guide and not skip or take short cuts when deploying your cluster as it can lead to wonky behavior of your cluster.

Wonky Mesos Clusters

There are a number of open source projects out there that attempt to deploy a proper Mesos cluster, but each one that I have evaluated (there have been a lot) has always fallen short somewhere. – everpeace/vagrant-mesos currently only works for version 0.23.1 and older. There haven’t been updates to the project in some time. – mesosphere/playa-mesos runs on virtualbox, but I found a number of issues with how the nodes are configured and ran into issues using certain frameworks, such as the Elastic Search framework, because of virtualbox’s networking layer. The configuration that is deployed is only a single master node; so no high availability. This project also hasn’t been updated in some time. – minimesos project deploys a configuration that is backed by docker containers so if you need to modify something like the slave nodes (in our case, we need to) this isn’t going to be a good option. Like the previous method, single master and no high availability.

If you want kick the tires on all the functionality that Mesos has to offer, I would still recommend that you deploy these nodes by hand. If that is too time consuming or you don’t have access to AWS or hardware resources, playa-mesos gets you most of the way there. The {code} team has a fork of that project which has some bug fixes as well as some enhancements. You can find our fork on GitHub located at emccode/vagrant/playa-mesos and if you chose to go this route, the {code} fork of playa-mesos has mesos-module-dvdi already pre-configured using VirtualBox as the external storage provider in which case you can use this walkthough to verify your settings. Just a reminder, the purpose of this walkthrough is adding external persistent volumes for production Mesos environments in which you will most likely take the steps below and incorporate them into a DevOps tool that your organization uses.

mesos-module-dvdi Installation Walkthrough

mesos-module-dvdi builds on top of functionality that is provided by REX-Ray and DVDCLI. So the first thing we need to do is install both packages on all your Mesos slave/agent nodes (NOTE: that all steps outlined in this section needs to be done on all your slave/agent nodes as root). You can do that by running the following commands:

curl -sSL https://dl.bintray.com/emccode/rexray/install | sh -
curl -sSL https://dl.bintray.com/emccode/dvdcli/install | sh -

Then you need you configure REX-Ray with the storage provider you plan on using. Since I usually host my configurations on Amazon for demonstration purposes, I am going to configure REX-Ray to use EC2 and place the file at /etc/rexray/config.yml. This is what my configuration file looks like:

rexray:
  storageDrivers:
  - ec2
  volume:
    mount:
      preempt: true
    unmount:
      ignoreUsedCount: true
aws:
  accessKey: <YOUR_ACCESS_KEY>
  secretKey: <YOUR_SECRET_KEY>

You can do a simple test to make sure REX-Ray and DVDCLI are functioning properly by running the following command: rexray volume. If you need help on configuring REX-Ray for other storage platforms, you can view the REX-Ray configuration guide.

Next, we need to install the mesos-module-dvdi which gives us the ability to provision, mount, unmount external volumes to Mesos tasks. You can download the version that matches your Mesos configuration from our GitHub releases page. My Mesos cluster is running version 0.27.0, so I am going to download libmesos_dvdi_isolator-0.27.0.so and place the .so in the /usr/lib directory. We also need to create a Mesos isolator configuration file so that the Mesos slave/agent knows how to load the isolator module. Create the file /usr/lib/dvdi-mod.json with the following content inside (replace with your version of the downloaded isolator):

{
   "libraries": [
     {
       "file": "/usr/lib/libmesos_dvdi_isolator-0.27.0.so",
       "modules": [
         {
           "name": "com_emccode_mesos_DockerVolumeDriverIsolator",
           "parameters": [
            {
              "key": "isolator_command",
              "value": "/emc/dvdi_isolator"
            }
          ]
         }
       ]
     }
   ]
 }

Finally, we just need to add the hooks for the Mesos slave/agent to pick up the configuration file and load the isolator. You can do that by running the following shell commands:

echo "docker,mesos" | tee /etc/mesos-slave/containerizers
echo "com_emccode_mesos_DockerVolumeDriverIsolator" | tee /etc/mesos-slave/isolation
echo "file:///usr/lib/dvdi-mod.json" | tee /etc/mesos-slave/modules
service mesos-slave restart

Success! This configuration will also allow you to run external volumes for docker workloads which is why you see docker in the first command. To learn more about using external storage with the docker containerizer in Apache Mesos, please checkout this great article on the EMC {code} blog.

Very Nice Great Success

Exercising the mesos-module-dvdi

Now that we have all this configured correctly, lets start out by creating a couple of external volumes by launching a Mesos task. Create a file called basic.json with the following content inside:

{
  "id": "hello-mesos",
  "cmd": "while [ true ] ; do touch /var/lib/rexray/volumes/firstvolume/hello1 ; sleep 5 ; done",
  "mem": 16,
  "cpus": 0.1,
  "instances": 1,
  "env": {
    "DVDI_VOLUME_NAME": "firstvolume",
    "DVDI_VOLUME_OPTS": "size=5,iops=150,volumetype=io1,newfstype=xfs,overwritefs=false",
    "DVDI_VOLUME_DRIVER": "rexray",
    "DVDI_VOLUME_NAME1": "secondvolume",
    "DVDI_VOLUME_DRIVER1": "rexray",
    "DVDI_VOLUME_OPTS1": "size=6,volumetype=gp2,newfstype=ext4,overwritefs=false"
  }
}

Then we can launch the Marathon task by running the following shell command:

curl -k -XPOST -d @basic.json -H "Content-Type: application/json" :8080/v2/apps

This simply creates two new volumes called “firstvolume” and “secondvolume” and uses the default REX-Ray mount location /var/librexray/volumes to mount these volumes.

For a more complex example, lets stand up a simple web server with an external volume and scribble some data on it. Create a file called web.json with the following content inside and replace YOUR_NAME_HERE with your first name (be careful and try not to remove the single quote trailing it):

{
  "id": "webserver",
  "uris": [
    "https://github.com/dvonthenen/goprojects/raw/master/bin/statichttpserver"
  ],
  "cmd": "echo 'Hello, YOUR_NAME_HERE' $(cat /var/lib/rexray/volumes/webdata/readme.txt | wc -l) >> /var/lib/rexray/volumes/webdata/readme.txt && chmod u+x statichttpserver &&  ./statichttpserver -port=$PORT -path=/var/lib/rexray/volumes/webdata",
  "mem": 16,
  "cpus": 0.1,
  "instances": 1,
  "constraints": [
    ["hostname", "UNIQUE"]
  ],
  "env": {
    "DVDI_VOLUME_NAME": "webdata",
    "DVDI_VOLUME_OPTS": "size=5,iops=150,volumetype=io1,newfstype=xfs,overwritefs=false",
    "DVDI_VOLUME_DRIVER": "rexray"
  }
}

Then we can launch the Marathon task by running the following shell command:

curl -k -XPOST -d @web.json -H "Content-Type: application/json" :8080/v2/apps

You can find out what slave/agent node and port the web server is running on by clicking on the running task in the Marathon UI and looking at the application configuration information on the page (as seen below).

Marathon Task

And if you open up that hostname and port in your web browser (you may have noticed that my FQDN name isn’t the same since I configured my EC2 instances without elastic IPs), you will have accessed the webserver we downloaded from my GitHub account and you should see a file readme.txt at the root. When you click that readme.txt to display the contents, you should see your name inside the text file.

Opening up the readme.txt

Although the second example is a fairly meaningful real world example of using external volumes/storage, the real benefits don’t become apparent until you start doing things like failing the Mesos slave/agent node that is currently running the task. We can simulate this failure, by simply stopping the Marathon task and relaunching it. The new instance of our task may start up on a different node, but the important take away is that the external volume from the first instance will be reattached to the new task thus preserving any prior data. If you open the readme.txt after the task enters the running state, you should see the previous “Hello” line with a “0” at end now followed by a “Hello” line ending in “1” that this new instance has added on. Now just imagine a database like PostgreSQL or an Elastic Search node as a Marathon task. Any failure in the Mesos slave/agent or health check will trigger the task to start up from its previous state on a new node. Say “Hello” to high availability!

Persistence!

What’s Next…

Very cool! Hopefully this served as a good guide to adding external volume/storage support to your existing Apache Mesos cluster using REX-Ray, DVDCLI, and mesos-module-dvdi. I have a couple of ideas on some follow up blog posts… thinking about how I do dev/test for mesos-module-dvdi with Docker containers or perhaps more about frameworks. If you have any topics you might want me to discuss, please drop me a line on twitter at @dvonthenen.